Configure and Connect a MySQL Database Instance with a Web Server and Set up the Monitoring of the Solution


DESCRIPTION:
Deploy a new multi-tier application. The application will take live inputs from the employees, and it will be hosted on a web server running on the AWS cloud. Set up the web server and configure it to scale automatically in cases of a traffic surge, to make the application highly available and take the inputs from the employees and store them securely in the database.
Here firstly, we create the **VPC(Virtual Private Network)**to process the Infrastructure securely.
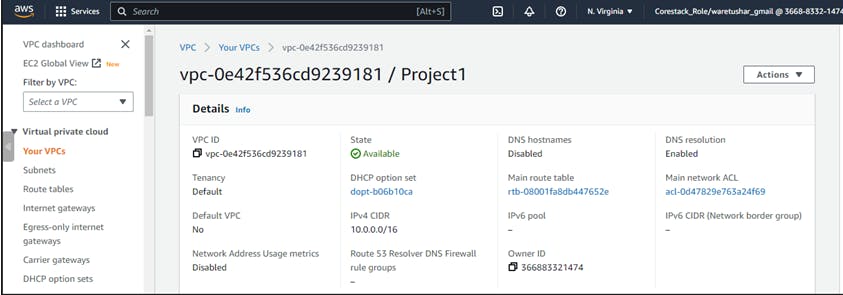
A. Create VPC: This step involves creating a new VPC in the AWS account.
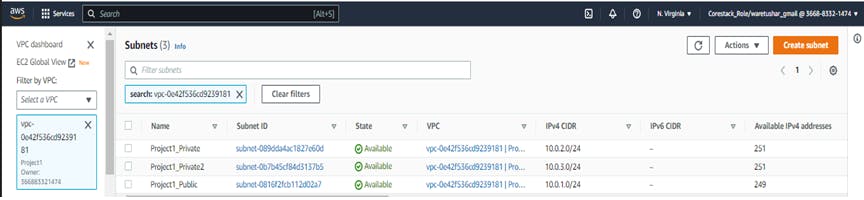
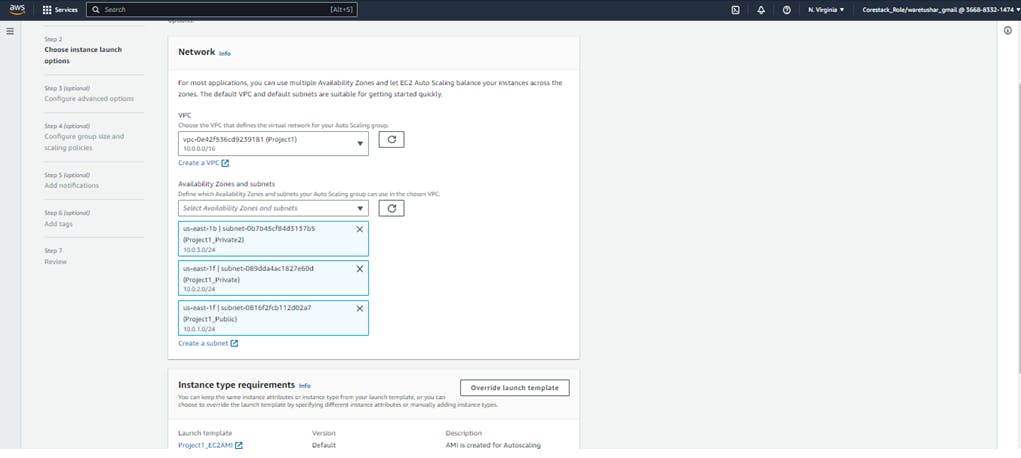
B. Create Subnets: Once created the VPC, we can create one or more subnets within it. Create public and private subnets and specify the IP address range for each subnet. Public subnets are associated with a route table that has a route to the internet gateway. Private subnets are associated with a route table that has a route to a NAT gateway.
Created 1 Public and 2 Private Subnets(1 Private will be laterly used in RDS)
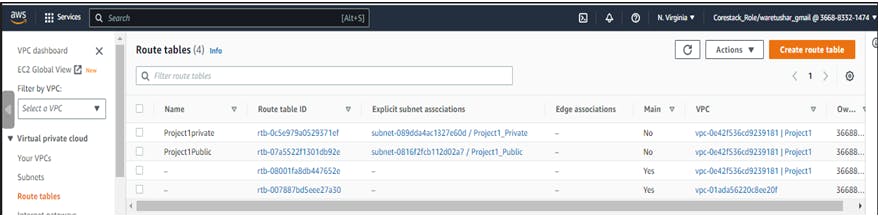
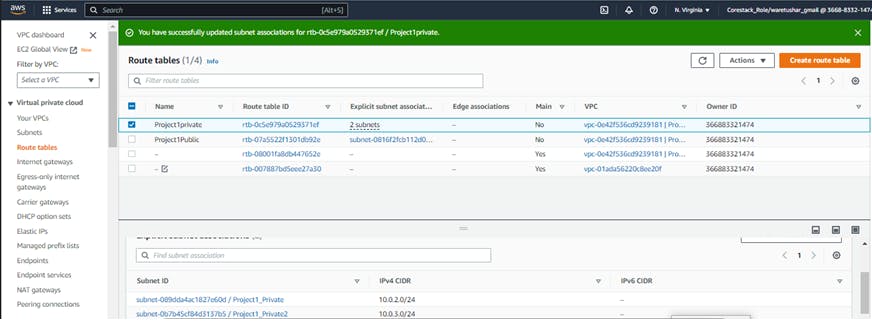
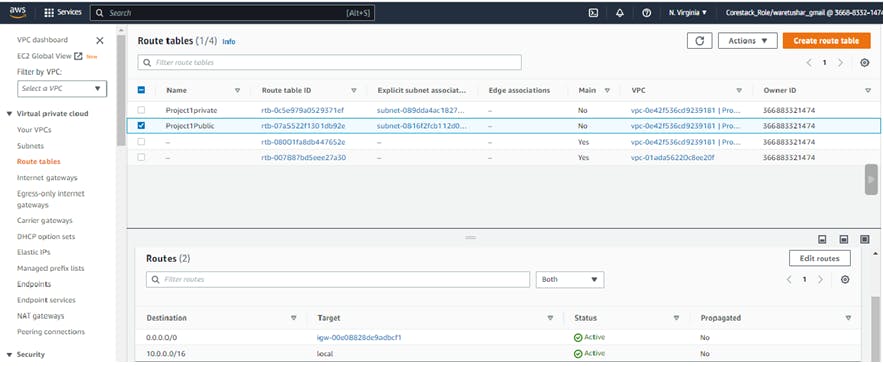
C. Create Route Tables: Create separate route tables for public and private subnets. The public route table should have a route to the internet gateway, and the private route table should have a route to the NAT gateway.
Created 2 Route Tables for private & public subnets and associated them with Subnet association
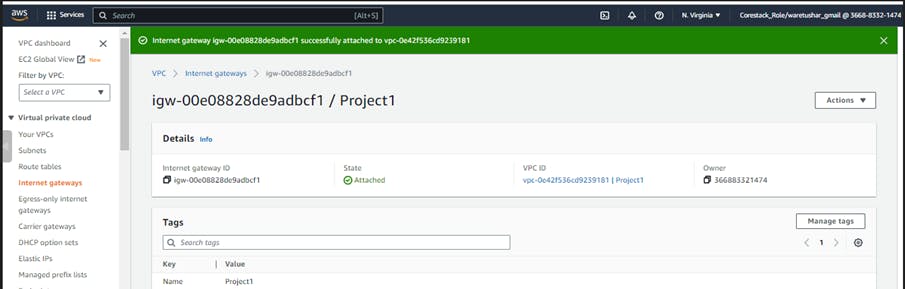
D. Create Internet Gateway: An internet gateway is a horizontally scaled, redundant, and highly available VPC component that allows communication between instances in your VPC and the internet. You need to create an internet gateway and attach it to your VPC.
Created Internet Gateway and have attached to VPC.
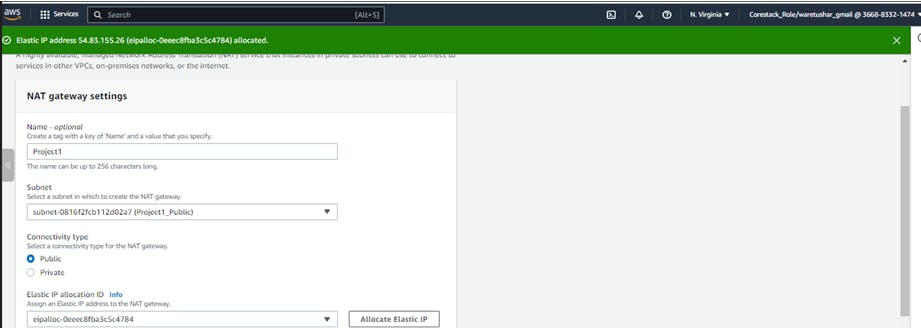
E. Create NAT Gateway: A NAT gateway enables instances in a private subnet to connect to the Internet or other AWS services, but prevents the Internet from initiating a connection with those instances. Create a NAT gateway in a public subnet and route traffic from the private subnet to the NAT gateway via the private route table.
Created NAT Gateway (1 in the public subnet), then routed them from the Route table as follows: Public routed to IGW & Private routed to NAT Gateway.
F. Enable DNS Hostname: Enable DNS hostname resolution for VPC to allow instances in the VPC to have a DNS hostname assigned to them. This makes it easier to identify instances in VPC and access them using their DNS hostname
Lastly, enable the DNS hostname from VPC by the following tabs> Actions>VPC Settings.
EC2 instance-webserver:
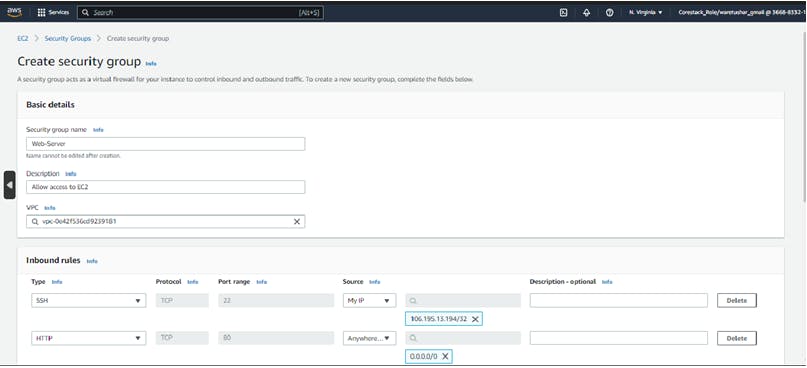
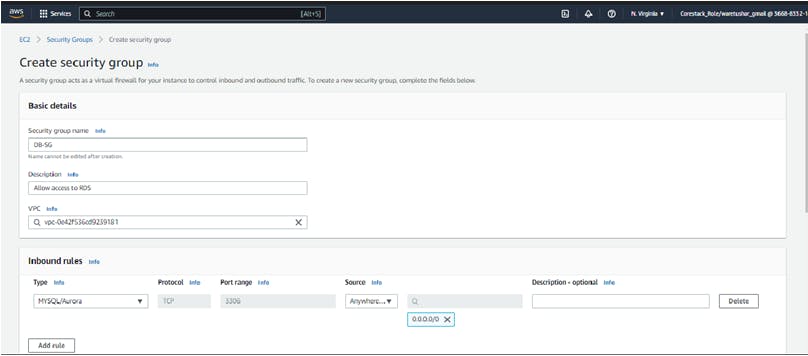
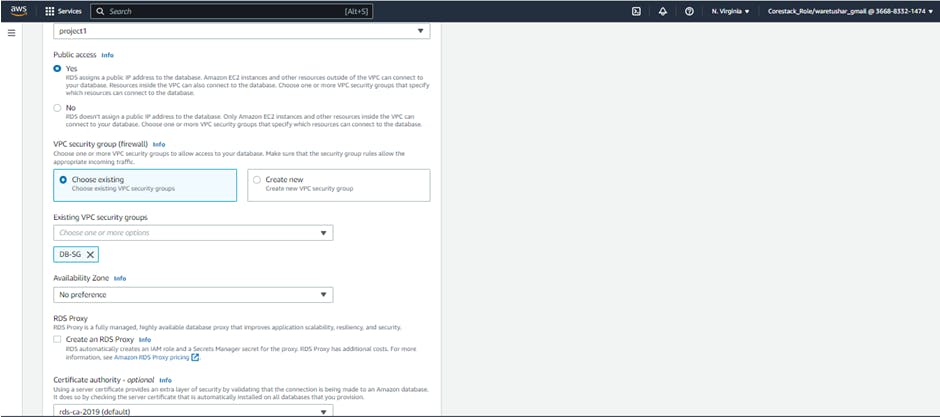
A. Before creating the EC2 instance, need to create security groups that define the inbound and outbound traffic rules for the instance. create separate security groups for the web server and the RDS instance. For the web server security group, allow inbound traffic on port 80 for HTTP and port 22 for SSH. For the RDS security group, allow inbound traffic on port 3306 for MySQL/Aurora.
Created the 2 Security Groups for EC2 (Webserver) by allowing inbound traffic as HTTP & SSH & for RDS (DB) by allowing inbound traffic as MYSQL/Aurora.
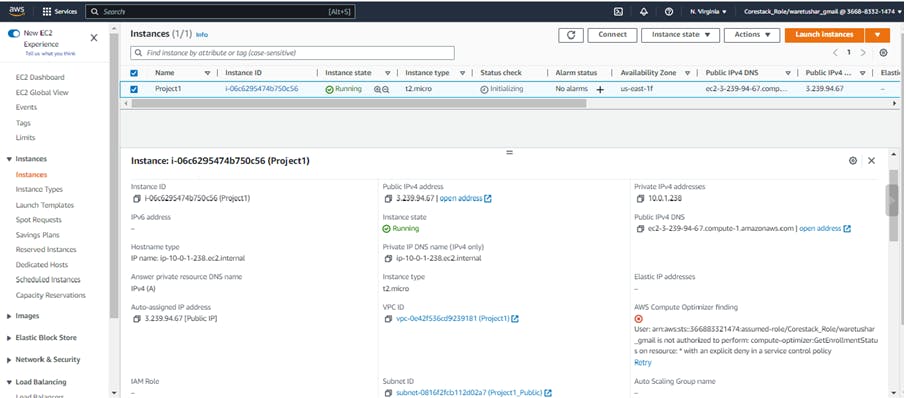
B. Create EC2 Instance: Launch an EC2 instance and select the VPC & subnet that was created earlier and assign the security groups to the instance.
Created EC2 Instance by select the network setting we created for VPC & Security group.
C. Connect to the EC2 Instance: After launching the EC2 instance, connect to it using a tool like PuTTY. Need to convert the key file from .pem to .ppk format using PuTTYgen and then configure the connection settings in PuTTY. Use the public IPv4 address of the EC2 instance as the hostname and the .ppk file as the private key. Once connected to the instance, can log in as the default user, "ec2-user".
Test the EC2 Instance connecting to the Linux instance by using Putty.
i. Firstly, converted the key file that created for instance, from .pem to .ppk file by using Putty gen.
ii. Then logged in to Putty by mentioning the Hostname (Public IP V4 address of EC2 instance) & configuring the .pem file. (Connection>SSH & upload the file)>Open. Lastly, enter the login as: ec2-user
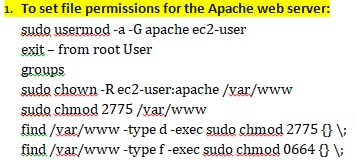
D. Install and Test the Web Server: Once connected to the EC2 instance, can install the Apache web server using a package manager like yum, then test that the web server is working by entering the public DNS name of the EC2 instance in the address bar of a web browser. If everything is set up correctly, then should see the default Apache web page.
Installed & tested the Apache Server is working successfully. Entered the public Domain Name System (DNS) name of EC2 instance in the address bar of a web browser
Installed the Apache web server by following commands in Putty:
Sudo su – for admin root
sudo yum update –y
sudo amazon-linux-extras install php8.0 mariadb10.5
sudo yum install -y httpd
sudo systemctl start httpd
sudo systemctl enable httpd

- Database –RDS:
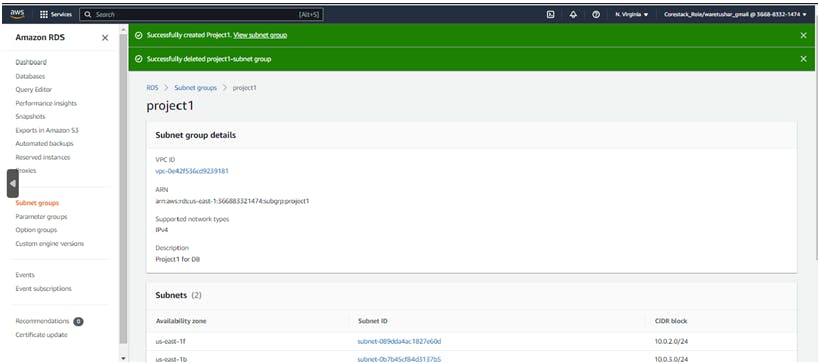
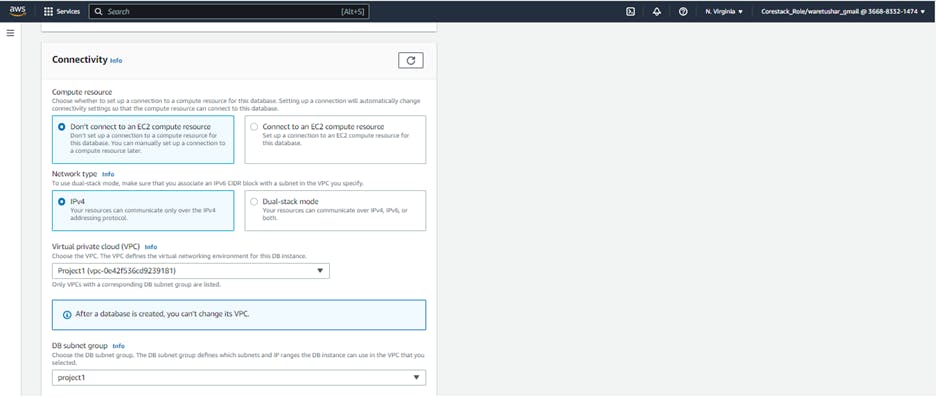
A. Create Subnet Group: Before creating the RDS database, need to create a subnet group that defines the subnets in which the database will be deployed. Select the VPC and the private subnets that were created earlier for this purpose.
DB needs a subnet group and created the group by selecting the VPC & Private Subnets we created earlier.
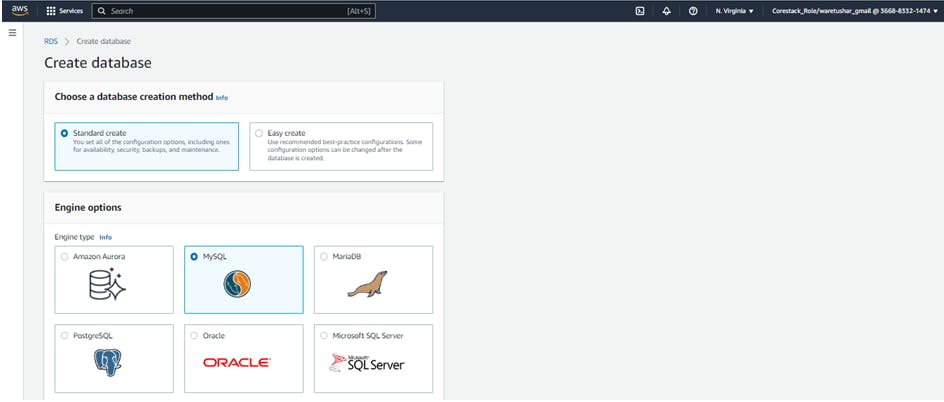
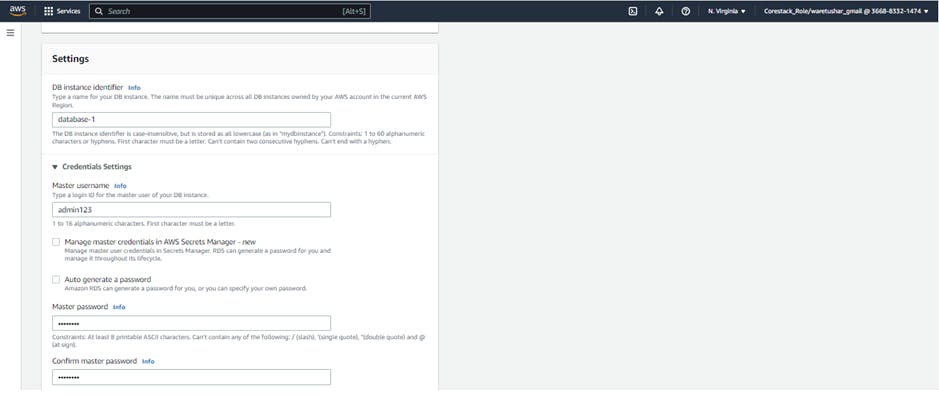
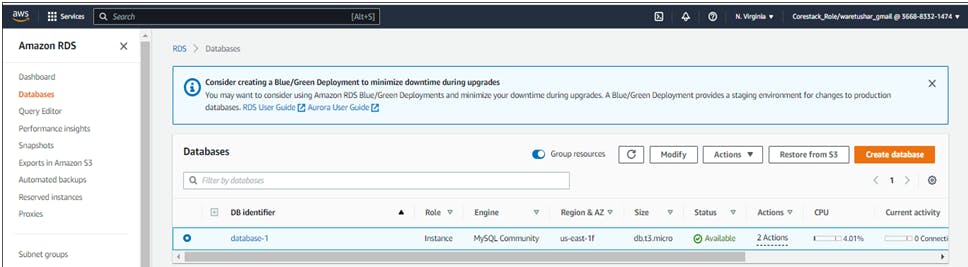
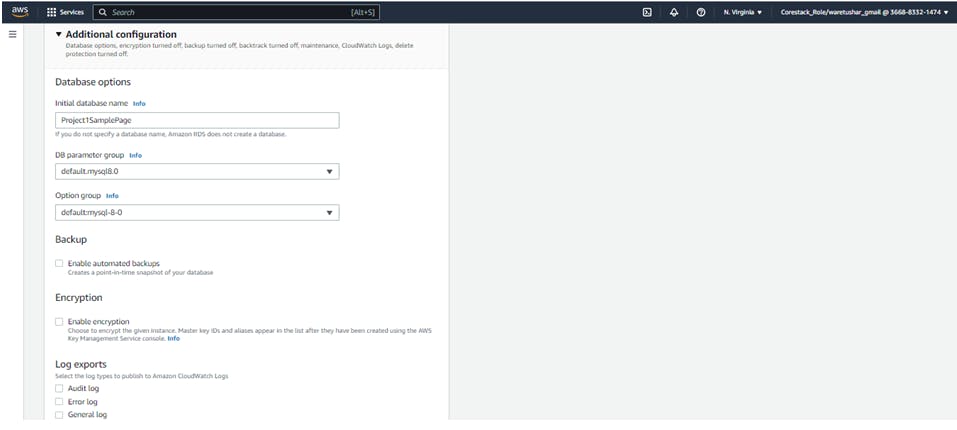
B. Create RDS Database: Once created the subnet group, you launch the RDS database instance. Select the VPC and subnet group that was created earlier and choose the required database engine, instance type, and other options. Also, need to specify an initial database name, like "Project1SamplePage".
Created the RDS database, selecting the VPC & subnets group by naming the initial database name: Project1SamplePage and choosing the required options.
C. Connect Web Server to DB Instance: After launching the RDS database instance, connect the web server running on an EC2 instance to it using the appropriate credentials. Use the command line interface (CLI) to run the necessary commands to establish the connection. Need to provide the endpoint URL, username, password, and database name to establish the connection.
Connected the Web Server to DB instance by giving command on CLI.
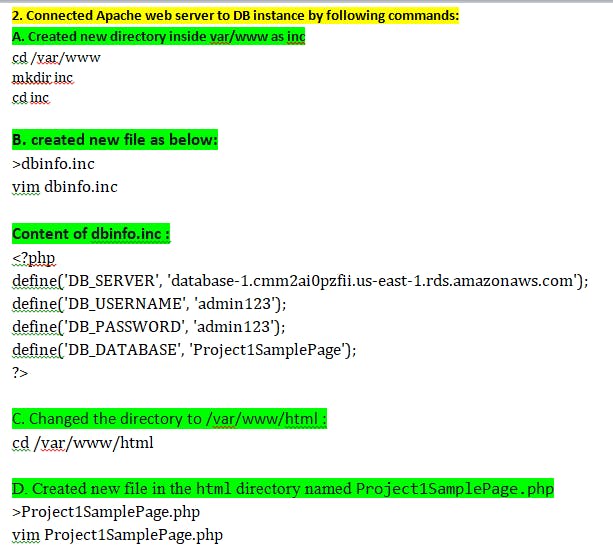
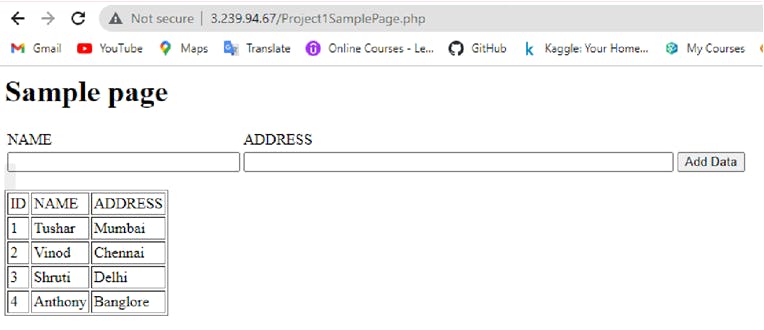
E. Added Script to the Project1SamplePage.php file:
    <?php include "../inc/dbinfo.inc"; ?>
    <html>
    <body>
    <h1>Sample page</h1>
    <?php

      /* Connect to MySQL and select the database. */
      $connection = mysqli_connect(DB_SERVER, DB_USERNAME, DB_PASSWORD);

      if (mysqli_connect_errno()) echo "Failed to connect to MySQL: " . mysqli_connect_error();

      $database = mysqli_select_db($connection, DB_DATABASE);

      /* Ensure that the EMPLOYEES table exists. */
      VerifyEmployeesTable($connection, DB_DATABASE);

      /* If input fields are populated, add a row to the EMPLOYEES table. */
      $employee_name = htmlentities($_POST['NAME']);
      $employee_address = htmlentities($_POST['ADDRESS']);

      if (strlen($employee_name) || strlen($employee_address)) {
        AddEmployee($connection, $employee_name, $employee_address);
      }
    ?>

    <!-- Input form -->
    <form action="<?PHP echo $_SERVER['SCRIPT_NAME'] ?>" method="POST">
      <table border="0">
        <tr>
          <td>NAME</td>
          <td>ADDRESS</td>
        </tr>
        <tr>
          <td>
            <input type="text" name="NAME" maxlength="45" size="30" />
          </td>
          <td>
            <input type="text" name="ADDRESS" maxlength="90" size="60" />
          </td>
          <td>
            <input type="submit" value="Add Data" />
          </td>
        </tr>
      </table>
    </form>

    <!-- Display table data. -->
    <table border="1" cellpadding="2" cellspacing="2">
      <tr>
        <td>ID</td>
        <td>NAME</td>
        <td>ADDRESS</td>
      </tr>

    <?php

    $result = mysqli_query($connection, "SELECT * FROM EMPLOYEES");

    while($query_data = mysqli_fetch_row($result)) {
      echo "<tr>";
      echo "<td>",$query_data[0], "</td>",
           "<td>",$query_data[1], "</td>",
           "<td>",$query_data[2], "</td>";
      echo "</tr>";
    }
    ?>

    </table>

    <!-- Clean up. -->
    <?php

      mysqli_free_result($result);
      mysqli_close($connection);

    ?>

    </body>
    </html>


    <?php

    /* Add an employee to the table. */
    function AddEmployee($connection, $name, $address) {
       $n = mysqli_real_escape_string($connection, $name);
       $a = mysqli_real_escape_string($connection, $address);

       $query = "INSERT INTO EMPLOYEES (NAME, ADDRESS) VALUES ('$n', '$a');";

       if(!mysqli_query($connection, $query)) echo("<p>Error adding employee data.</p>");
    }

    /* Check whether the table exists and, if not, create it. */
    function VerifyEmployeesTable($connection, $dbName) {
      if(!TableExists("EMPLOYEES", $connection, $dbName))
      {
         $query = "CREATE TABLE EMPLOYEES (
             ID int(11) UNSIGNED AUTO_INCREMENT PRIMARY KEY,
             NAME VARCHAR(45),
             ADDRESS VARCHAR(90)
           )";

         if(!mysqli_query($connection, $query)) echo("<p>Error creating table.</p>");
      }
    }

    /* Check for the existence of a table. */
    function TableExists($tableName, $connection, $dbName) {
      $t = mysqli_real_escape_string($connection, $tableName);
      $d = mysqli_real_escape_string($connection, $dbName);

      $checktable = mysqli_query($connection,
          "SELECT TABLE_NAME FROM information_schema.TABLES WHERE TABLE_NAME = '$t' AND TABLE_SCHEMA = '$d'");

      if(mysqli_num_rows($checktable) > 0) return true;

      return false;
    }
    ?>
D. Verify Connection: Once connected the web server to the RDS database instance, verify the connection by opening a web browser and browsing to the URL of your web application and should be able to see the content of the web page, which is dynamically generated by querying the database.
Verified the web server successfully connects to DB instance by opening a web browser and browsing to ec2-3-239-94-67.us-west-2.compute.amazonaws.. Project1SamplePage.php.
- Autoscaling & Healthcheck using Route 53:
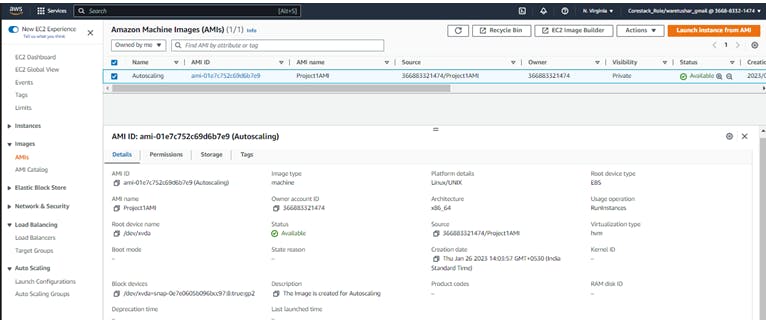
A. Create EC2 Instance: Before creating an autoscaling group, create an EC2 instance that serves as a template for creating multiple instances. Once created the instance, you can install and configure the required software, and then create an Amazon Machine Image (AMI) of the instance that can be used to launch new instances.
Created AMI EC2 webserver for Autoscaling and notification
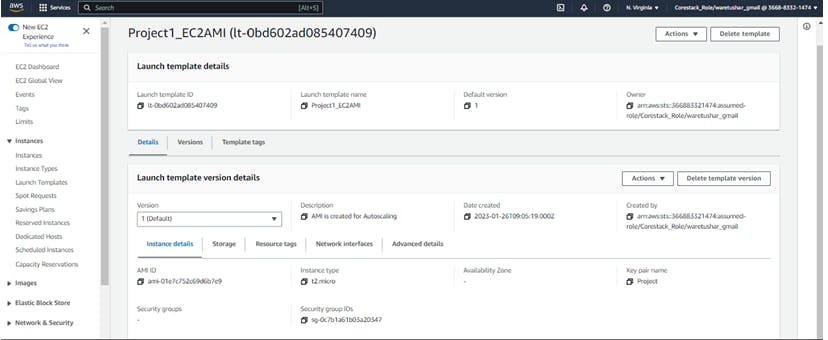
Created Launch Template by adding user data
#!/bin/bash
yum update -y
amazon-linux-extras install -y lamp-mariadb10.2-php7.2
yum install -y httpd
cd/var/www/html
echo>Project1SamplePage.php
systemctl start httpd
systemctl enable httpd
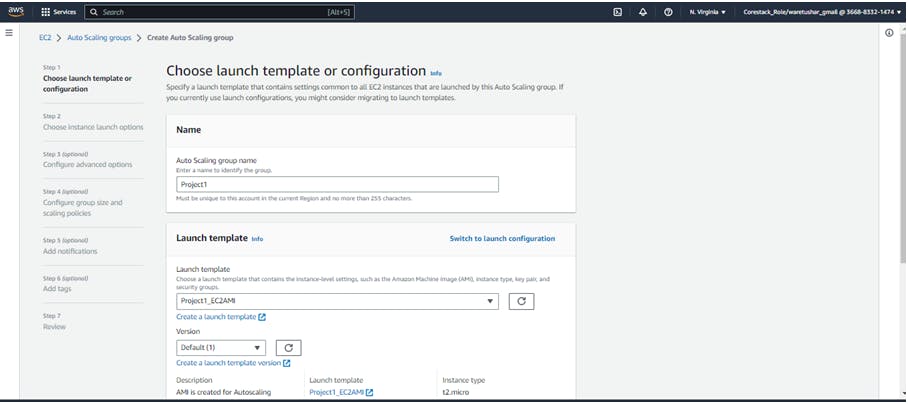
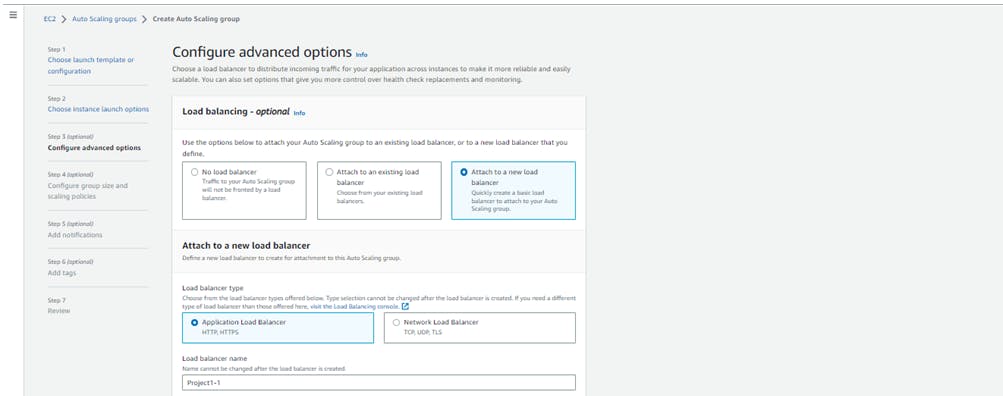
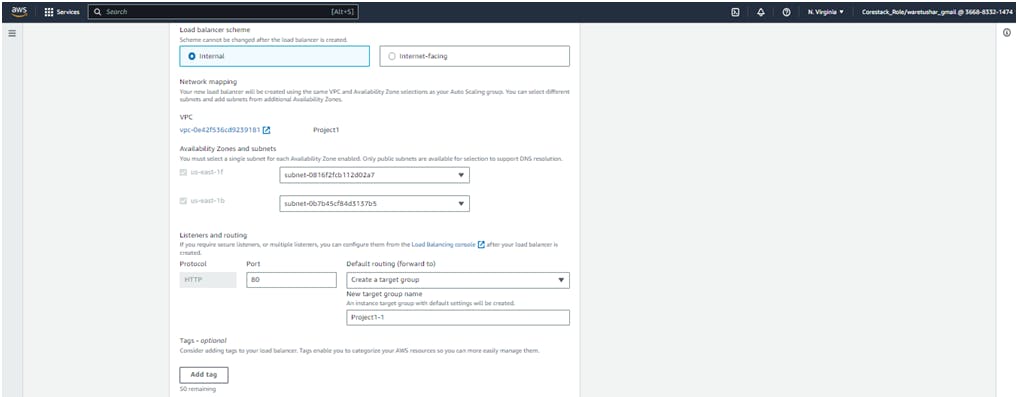
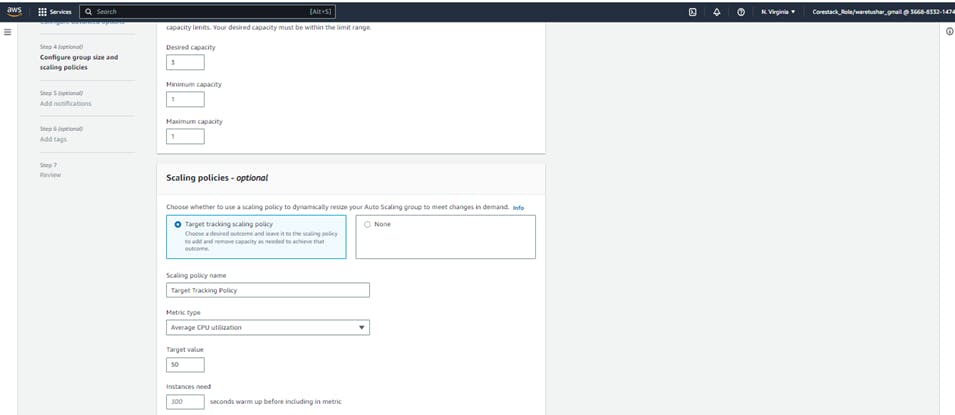
B. Create Autoscaling Group: Create an autoscaling group that uses the AMI as a launch configuration. You can select the VPC, subnets, and other configuration details that you created earlier for this purpose. You can also attach a new load balancer that distributes traffic across multiple instances in the group.
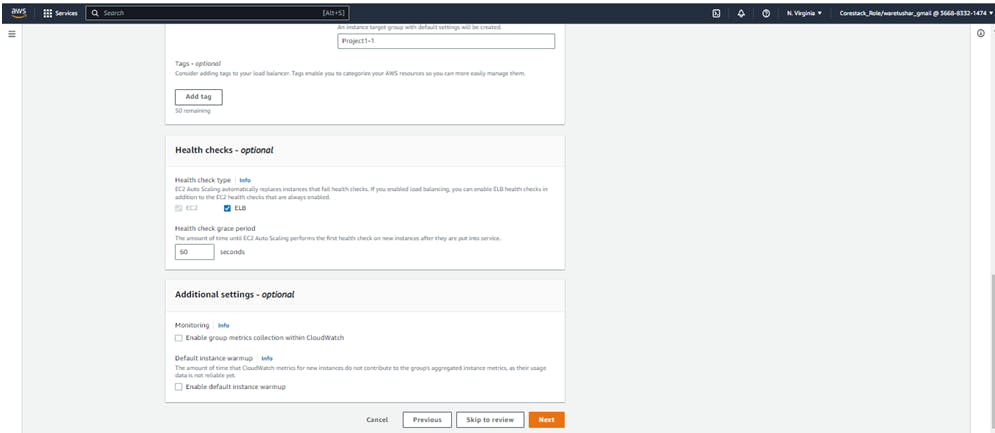
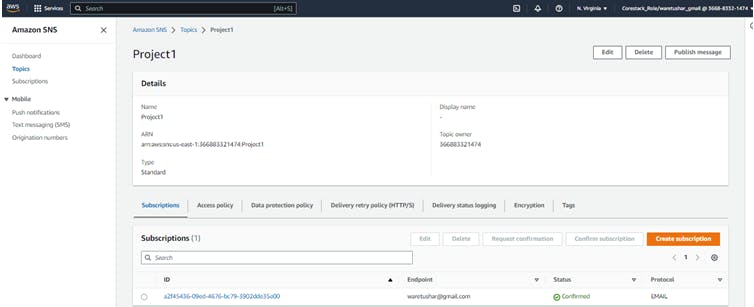
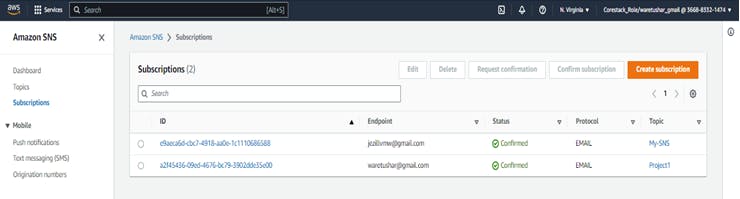
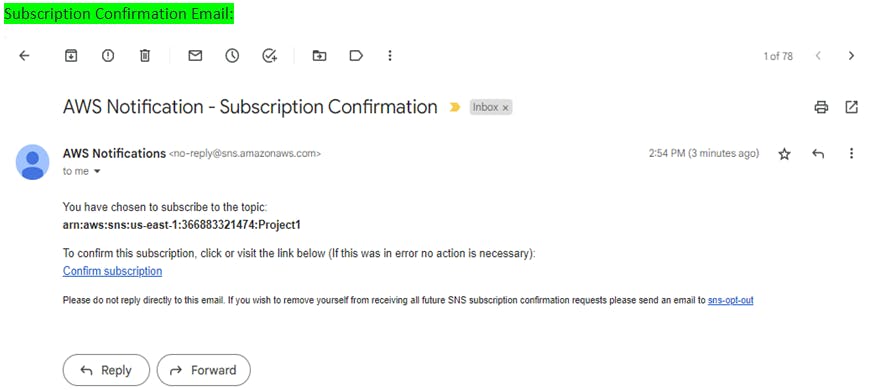
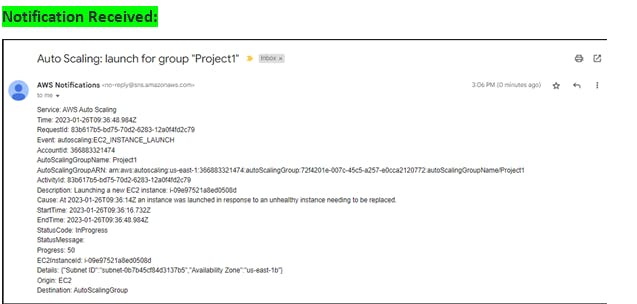
Created an Autoscaling group by applying the existing details we created for VPC & subnets. Also attaching the New Load Balancer. 1 Scaling Policy, 1 Topic, 1 Subscription, 1 Notification, 1 Load Balancer, 1 Target Group, 1 Listener created successfully. 1 Target group has been attached to ASG and Group metrics collection is enabled.
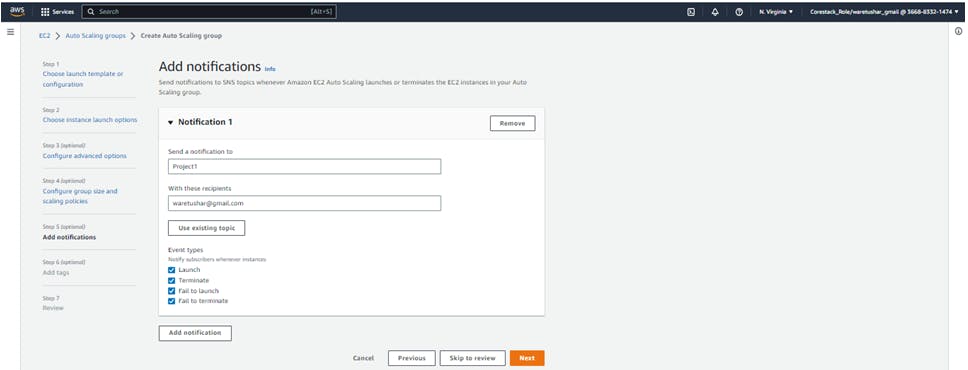

Create Notifications: Once configured the scaling policy and alarms, create a notification that sends an email or message when an event occurs, such as scaling up or down. Create a topic, a subscription, and a notification that specify the details of the message and the recipient.
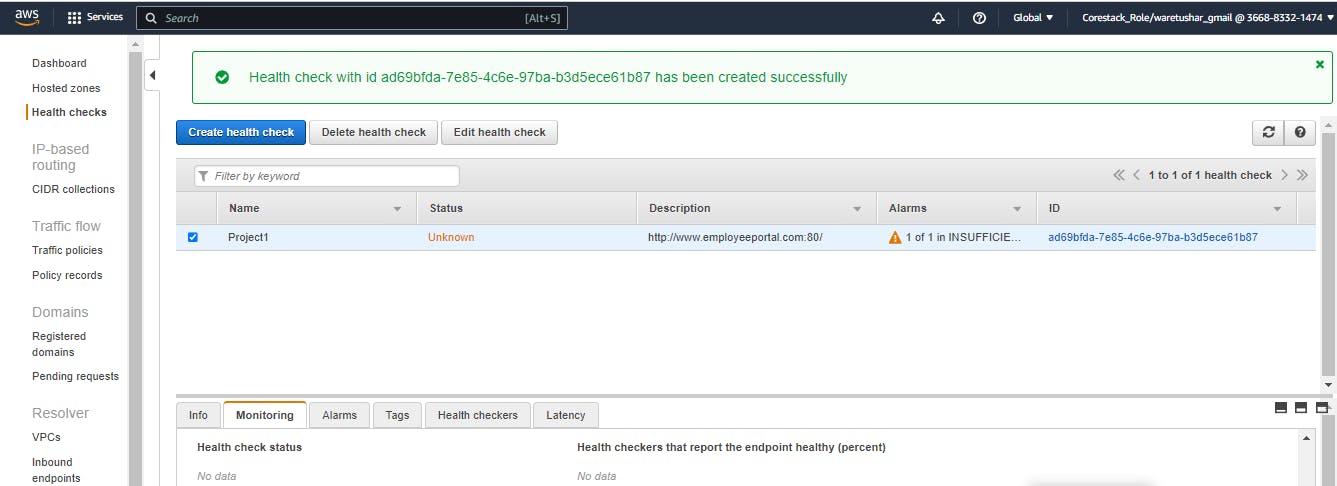
C. Configure Health Check: Finally, configure a health check using Route 53 that monitors the availability of the web server and redirects traffic to healthy instances. Specify a domain name, such as employeeportal.com, and configure the routing policies and health checks that determine how traffic is directed.
created the Health check using Route 53 by giving the domain name employeeportal.com